Discord bots are programs that allow automated interaction with Discord services.
They can be programmed to do simple tasks, such as play music or print a welcome message, or they can perform multiple tasks based on pre-programmed commands.
Discord bots are also handy for maintaining and moderating large servers as they can be used to moderate certain administration-level tasks.
There are also several bots available that you can access through the bot store.
In this tutorial, we’ll build a Discord bot using Python.
Table of Contents
Bot creation requirements
Creating a Discord bot is a simple, straightforward procedure and can be done through the developer portal or by using any code editor.
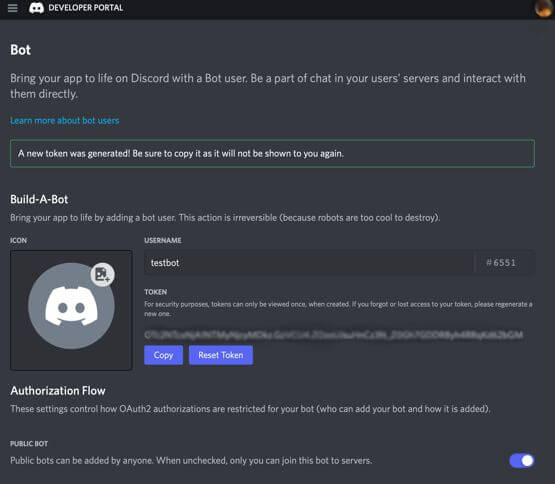
Before adding the code, a bot account needs to be created.
Go to the Discord developer portal at https://discord.com/developers/applications, login, and click on ‘New Application’.
Name this application and click on the option bot from the list on the left side.
Now, add a bot and after naming it, copy the token for further use.
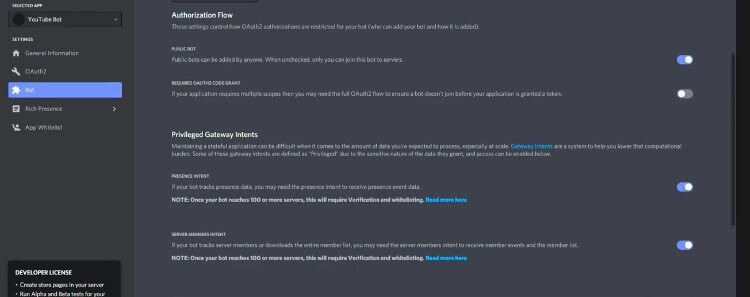
A Discord bot may need to access data that Discord qualifies as ‘sensitive’ in nature.
To give your bot access to privileged intents, you need to enable ‘Privileged Gateway Intents’ in the Developer Portal under the bots section.
This is only possible for unverified bots that are a part of less than 100 servers.
For verified bots, privileged intents need to be requested.
Discord API
The Discord API allows for simpler and deeper integration with other services that enable users to have a smoother user experience.
The API is an open API that can be used to serve requests for bots and OAuth2 integration.
Various versions of the API are in use, you can use the preferred version by adding it to the request path such as https://discord.com/api/v{version_number}.
If the version is not mentioned then the default version is used to follow operations.
Create your first Python Discord bot
To start making a Discord bot in Python, the library we will use ‘discord.py’ which implements Discord’s API extensively. You will need the pip command to install discord.py.
pip install -U discord.py
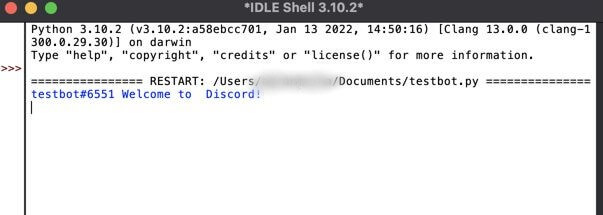
We can now begin making the connection with the API.
import discord

TOKEN = "Insert Your Token here"

discord_client = discord.Client()

@discord_client.event

async def on_ready():

    print(f'{discord_client.user} Welcome to  Discord!')

discord_client.run(TOKEN)
This code is used to set up the initial connection with Discord. We first import the required library discord.
The token value can be obtained from the developer portal. You can place the token within the program in the placeholder string provided above.
For a more secure approach, you can place it in a .env file and refer to the same in your program.
Hard-coding secure keys in the program is not a very good developer practice. We are doing it here for demonstration purposes.
The discord_client object is an instance of the Client class, which is the connection to Discord.
@client.event is used to register an event, it is called when something happens i.e. some event is triggered.
The on_ready function will be called when the connection is set up and the bot is ready to take further steps.
The final step then runs the bot using the login token specified above.
Now run the code to see an established connection.
Output:
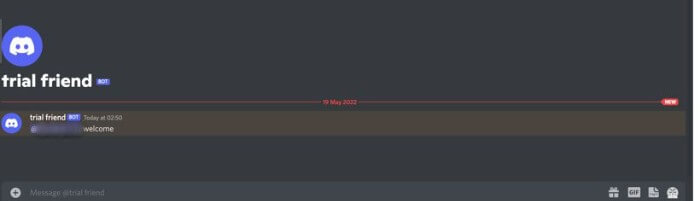
Welcome new members to the server
To print a welcome message when new users join the server, let’s add a new function on_member_join to the Python file.
import discord

from discord.ext import commands

TOKEN ="Insert Your token here"

intents=discord.Intents.all()

client = commands.Bot(command_prefix=',', intents=intents)

@client.event

async def on_member_join(member):

    await member.create_dm()

    await member.dm_channel.send(f'Hi {member.name}, welcome to the test Discord server!')

client.run(TOKEN)
Output:
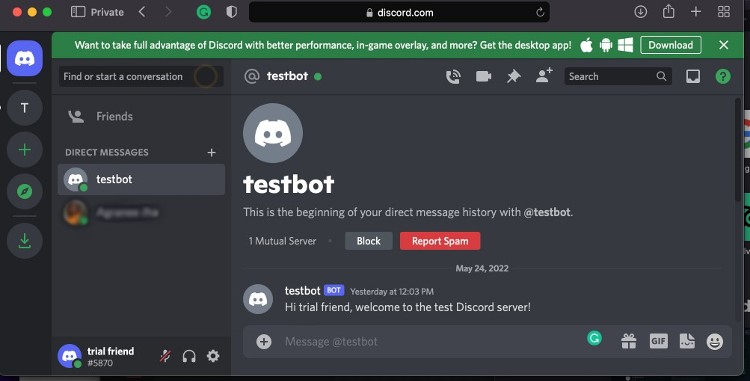
The welcome_member function uses create.dm method to send the welcome message as a direct message to the user on joining.
Intents are permissions for the bot that are enabled based on the features necessary to run the bot. To run on_member_join we need to ensure intents are enabled.
Discord Bot Commands
Commands are short directions to perform a particular action or specific task.
Many Discord bots that are available in the bot store have multiple pre-configured commands that can be enabled or disabled by visiting the dashboard.
Besides the command, the prefix required to run the command in Discord will also be available. These prefixes can be of various types such as exclamation marks and many more.
Discord has various types of commands such as chat commands, text commands, and slash commands. The slash-type commands are always executed by using a slash as the prefix.
The text commands need to be entered in the text box based on the syntax of the command, whereas chat commands are used by directly entering the command in the text box.
import discord

import random

from discord.ext import commands

TOKEN ="Insert Your token here"

discord_bot = commands.Bot(command_prefix='!')

@discord_bot.command(name='morningquote')

async def msg(ctx):

    quotes = [
        "It's a new day",
        (
            "Be positive"
        ),
    ]

    response = random.choice(quotes)

    await ctx.send(response)

discord_bot.run(TOKEN)
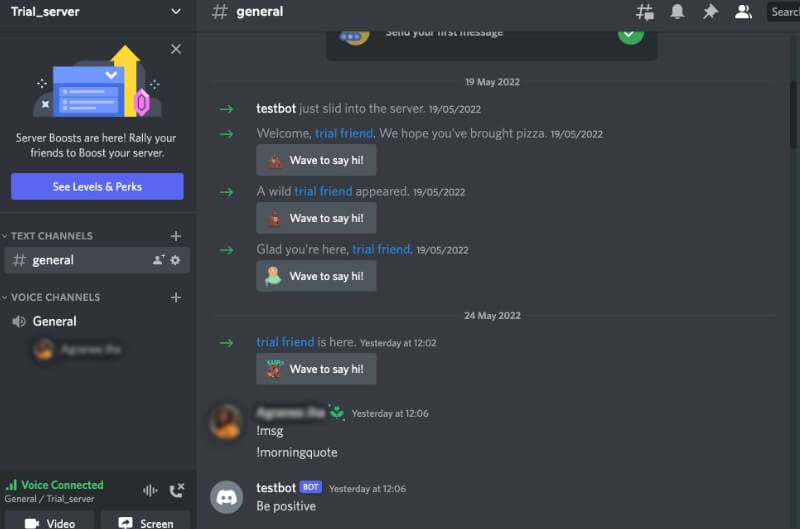
While using commands, we use discord_bot.command to set the prefix for the command as ! and pass the name for the command as “morningquote”.
The command will be executed by the bot when a user types !morningquote in the chat.
Output:
Send text, image, or file
To send any data using Python, we use the send() method.
To send a text, add content to the method as shown:
import discord

from discord.ext import commands

TOKEN = "Insert Your token here"

discord_bot = commands.Bot(command_prefix='!')

@discord_bot.command(name='senddata')

async def send_data(ctx):

    await ctx.send("hello there")

discord_bot.run(TOKEN)
Output:

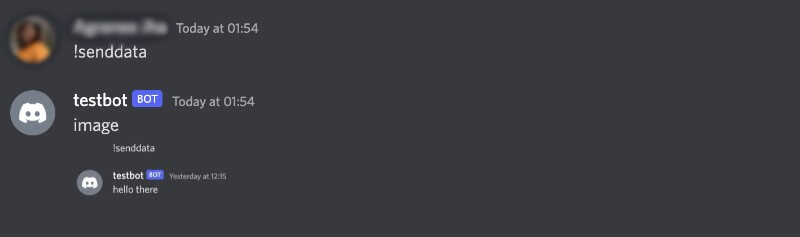
To send an image, add the image file to the method as shown below. The file my_file.png will be sent when the command !sendimg is used in the chat.
import discord

from discord.ext import commands

import os

os.chdir("Your file path")

TOKEN = "Insert Your token here"

discord_bot = commands.Bot(command_prefix='!')

@discord_bot.command(name='senddata')

async def send_img(ctx):

	await ctx.send("image",file=discord.File('Your file name'))

discord_bot.run(TOKEN)
Output:
To send a file or file-like object, you need to first open the file with the open() method and then use the send method to send data.
Send colored text
In Discord, it is possible to send a text in 8 different colors by code markup. It uses Highlight.js and solarized dark theme to achieve this effect.
import discord

from discord.ext import commands

TOKEN = "Insert Your token here"

discord_bot = commands.Bot(command_prefix='!')

@discord_bot.command(name='coloured_text')

async def test(ctx):

    retStr = str("""```yaml\nThis is some colored Text```""")

    await ctx.send(retStr)

discord_bot.run(TOKEN)
Output:
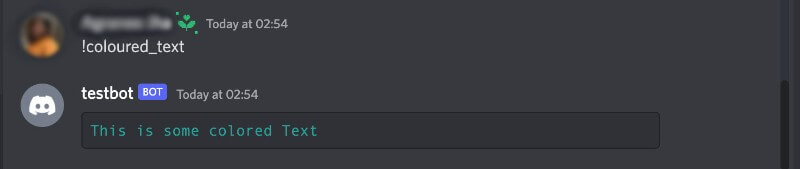
```yaml is the markup used to indicate the solarized cyan color. Below is a list of escape sequences or markup with their color codes that can be used to color your text.
Use the special characters such as ‘#’,'[‘, etc. wherever mentioned, to get the desired color. Note that the colored text is visible in the web application, but not the mobile application.
Default: #839496
```
Your text
```
Quote: #586e75
```bash
#Your text
```
Solarized Green: #859900
```diff
+ Your text
```
Solarized Cyan: #2aa198
```yaml
Your text
```
or
```cs
"Your text"
```
Solarized Blue: #268bd2
```ini
[Your text]
```
Solarized Yellow: #b58900
```fix
Your text
```
Solarized Orange: #cb4b16
```css
[Your text]
```
Solarized Red: #dc322f
```diff
-Your text
```
Simply replace the markup with markup for the desired color. The image below shows what the colors look like.

Get username from ID
To get the username based on the user id, we will use the fetch_user method. If the entire profile of a user is required then we can use the fetch_user_profile method.
import discord

from discord.ext import commands

TOKEN = "Insert Your token here"

discord_bot = commands.Bot(command_prefix='!')

@discord_bot.command(name='username')

async def user_name(ctx,user_id):

    user=await discord_bot.fetch_user(user_id)

    await ctx.send(user)

discord_bot.run(TOKEN)
Output:

Add user roles using the Discord bot
Roles are used to delegate permission to users within the server to help in management.
Roles can be implemented within large public servers such as in a learning-based server, roles like ‘student level 1’, ‘student level 2’, ‘teacher’, and ‘moderator’ can be assigned to users.
They can also be implemented in private servers with friends if such a need arises.
Each role has a different color and different permissions associated with it.
A user inherits the maximum permissions from each of the roles assigned to them.
The colors also work similarly, with the name of the member inheriting the role with the highest position in the hierarchy or with maximum permissions.
The roles have a linear hierarchy in Discord and can be managed from the ‘Manage role’ option in the ‘Roles’ tab.
Multiple roles with separate administrative powers can also be established so that the responsibilities of one user do not interfere with the other.
import discord

from discord import Member

from discord.ext.commands import has_permissions, MissingPermissions

from discord.ext import commands

TOKEN = "Insert Your token here"

intents=discord.Intents.all()

intents.members=True

bot = commands.Bot(command_prefix="!",intents=intents)

#code to add role
@bot.command()

@commands.has_permissions(manage_roles = True)

async def addRole(ctx, user : discord.Member, role:discord.Role):

    await user.add_roles(role)

    await ctx.send(f" Added {role} to {user.ention}")

@addRole.error

async def role_error(self,ctx,error):

    if isinstance(error, commands.MissingPermissions):

        await ctx.send("You are not authorized for this action")

bot.run(TOKEN)
To add a role, first, we use the commands to ensure that the user trying to add the role is authorized to do so.
We then use the add_roles method to add a function to the user.
Based on the requirements, you can allow multiple roles to be assigned to a user or use if-else statements to only allow one.
The role_error function is used to print an error message in case an unauthorized user tries to assign a role to another user.
Output:
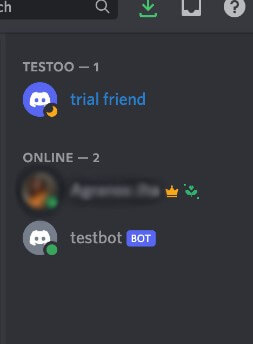
User is assigned the ‘testoo’ role.
Send a Direct Message to Users
A lot of Discord servers are configured to send a welcome message via direct message when a user joins the server or to send a warning if they violate any of the server’s rules.
Let us look at a code that sends a DM when the designated command is used.
import discord

from discord.ext import commands

TOKEN ="Insert Your token here"

intents=discord.Intents.all()

client = commands.Bot(command_prefix='!', intents=intents)

@client.command()

async def drtmsg(ctx, user:discord.Member, *, message=None):

    message = "welcome"

    embed=discord.Embed(title=message)

    await user.send(embed=embed)

client.run(TOKEN)
This function will take input such as !drtmsg @User and then send the message “welcome” via private messaging to the selected user.
Output:
Get members of a specific role and DM them
We first import the asyncio package for concurrent programming. We can use ctx.guild.roles to access the roles declared in the server.
The list of roles are fetched in user.roles which we can then traverse to find the correct role of the members and send them the desired message.
import asyncio

import discord

from discord.ext import commands, tasks

Token ="Insert Your token here"

prefix="!"

intents=discord.Intents.all()

bot = commands.Bot(command_prefix=prefix,intents=intents)

@bot.command(name='dm')

async def msg(ctx):

    for guild in bot.guilds:  # all servers of the bot

        role = discord.utils.find(lambda r: r.name == 'Your role name', guild.roles)

        for member in guild.members:

            if role in member.roles:

                await member.send("Dm to role member")

bot.run(Token)
Output:

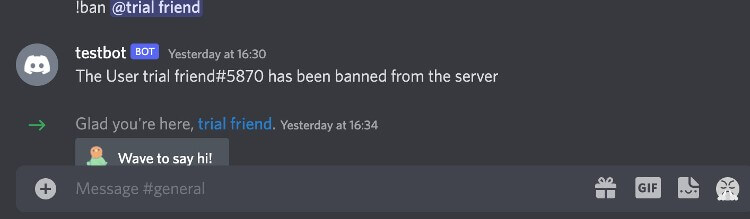
Ban/Kick Members using Discord bot
To remove a member from the server you need to add the following code to your Python file.
import discord

from discord import Member

from discord.ext import commands

from discord.ext.commands import has_permissions, MissingPermissions

TOKEN = "Insert Your token here"

intents=discord.Intents.all()

discord_client = commands.Bot(command_prefix='!',intents=intents)

@discord_client.command()

@has_permissions(kick_members=True)

async def kick(ctx, member:discord.Member,*,reason=None):

    await member.kick(reason=reason)

    await ctx.send(f'The User {member} has been kicked from the server')

@kick.error

async def kick_error(ctx,error):

    if isinstance(error,commands.MissingPermissions):

        await ctx.send("You do not have required permission for the action performed")

discord_client.run(TOKEN)
First, import the member and required permissions method from the discord library to allow us to manage permissions and address a user.
We use @discord_client.command() to use the client object of the bot and inform it the code written ahead is a command.
@has_permissions is used to check whether the user performing the action is authorized to do so or not.
kick is the function that performs the actions of removing the given user from the server.
A dynamic reason can also be given, we have however simply stated the reason as “test”.
The second function kick_error is an exception function that is executed if the user is not authorized to kick another user out and the error message is printed.
A user that is kicked out is not permanently banned from the server.
To ensure that a user is added to the banned member list of the server add the function defined below.
This will ensure that the user cannot rejoin the server as long as they are present in the list.
import discord

from discord import Member

from discord.ext import commands

from discord.ext.commands import has_permissions, MissingPermissions

TOKEN = "Insert Your token here"

intents=discord.Intents.all()

discord_client = commands.Bot(command_prefix='!',intents=intents)

@discord_client.command()

@has_permissions(ban_members=True)

async def ban(ctx, member:discord.Member,*,reason=None):

    await member.ban(reason=reason)

    await ctx.send(f'The User {member} has been banned from the server')

@ban.error

async def ban_error(ctx,error):

    if isinstance(error,commands.MissingPermissions):

        await ctx.send("You do not have required permission for the action performed")

discord_client.run(TOKEN)
Output:
Send a message at a specific time
To send a message at a specific time, the datetime library is required in addition to the discord library being used until now.
import discord

from datetime import datetime

client = discord.Client()

token = "Insert Your token here"

channel_id=Insert Your channel id without quotes

def time_required():

    while True:

        current_time = datetime.now().strftime("%H:%M")

        if current_time == "Insert required time":

            print("time reached")

            break

time_required()

@client.event

async def on_ready():

    print("bot:user ready == {0.user}".format(client))

    channel = client.get_channel(channel_id)

    await channel.send("timed message")

client.run(token)
The time_required function is created to establish when it is time to send the message. Until the required time is reached the bot will be in sleep mode.
Once it is time to send the message, the on_ready event will be executed, and the message “timed message” will be sent in the channel id mentioned in your code.
Output:

Play audio files in Python
To play audio files in Python, the FFmpeg library is an appropriate choice.
It can be downloaded from https://ffmpeg.org/.
Hover over the Windows icon and select ‘Windows builds by BtbN’ or ‘Windows builds from gyan.dev’.
In case you have doubts about which library to choose, use the one by gyan.dev as it includes all the libraries that could be required.
The Download tab takes you to a link from where you can download the required zip file.
Extract the files and place them in the C drive in a new folder or any location of your choice from where they can go live.
Add the path of this folder to the ‘PATH’ environment variable.
Also, import the audio file to the directory in which the bot is, or you have to specify the full path to the audio file.
In the below code we set up the play command such that when the bot joins the voice channel it will play the audio file ‘venezuela.mp3’ using the FFmpeg library.
Install the ‘PyNaCl’ library using pip:
pip3 install pynacl
You have to install and place ffmpeg in your Environment variables for this to run successfully.
import discord

import nacl

from discord import FFmpegPCMAudio

from discord.ext import commands

intents=discord.Intents.all()

token="Insert Your token here"

discord_bot = commands.Bot(command_prefix='!',intents=intents)

@discord_bot.command(pass_context=True)

async def play(ctx):

    if(ctx.author.voice):

        channel = ctx.message.author.voice.channel

        voice=await channel.connect()

        music_source = FFmpegPCMAudio('venezuela.mp3')

        player = voice.play(music_source)

    else:

        await ctx.send("please join voice channel")

discord_bot.run(token)
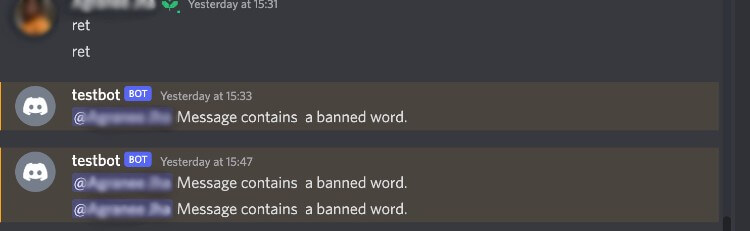
Filter words
Sometimes users may use inappropriate language that the server moderators may want to delete to maintain the decorum of the server.
To avoid having to analyze every message one by one, a function can be written to automatically filter out and delete messages that contain a word from a pre-defined list of banned words.
Ensure that your bot has administration capabilities to run this code.
In the on_message function, if the message sent by the user contains a word from the list bannedWords, the message is deleted and a warning is sent to the user to refrain them from sending using such words again.
We then use process_commands to ensure the bot continues to process other commands assigned to it.
import discord

from discord.ext import commands, tasks

import re

Token ="Insert Your token here"

prefix="!"

bot = commands.Bot(command_prefix=prefix)

def msg_contains_word(msg, word):

    return re.search(fr'\b({word})\b', msg) is not None

@bot.command()

async def loadcog(ctx, cog):

    bot.load_extension(f"cogs.{cog}")


@bot.command()

async def unloadcog(ctx, cog):

    bot.unload_extension(f"cogs.{cog}")

bannedWords={"ret"}

@bot.event

async def on_message(message):

    messageAuthor = message.author

    if bannedWords != None and (isinstance(message.channel, discord.channel.DMChannel) == False):

        for bannedWord in bannedWords:

            if msg_contains_word(message.content.lower(), bannedWord):

                await message.delete()

                await message.channel.send(f"{messageAuthor.mention} Message contains  a banned word.")

    await bot.process_commands(message)

bot.run(Token)
Output:
Conclusion
Discord is a powerful social media tool with a wide array of features. Bots additionally are extremely versatile and are capable to do a lot of things, some of which have been covered in this tutorial.
We can enable our bot to do a lot more things with the use of the correct combination of commands and events.